 Save to Pinterest
 There's something magical about turning simple chocolate bars into miniature Christmas trees. I discovered this trick while frantically prepping treats for my nephew's school holiday party—I had exactly three ingredients and twenty minutes, and honestly, I was just trying to look festive. The moment I stacked those Kinder bars and drizzled chocolate over them, watching the kids' faces light up made me realize some of the best treats come from happy accidents and bold simplicity.
I remember standing in my kitchen on December 23rd, chocolate smudged on my sleeve, watching my six-year-old carefully place a star on top of each tree like she was decorating a tiny forest. The sprinkles went everywhere—on the tray, on her hands, somehow in her hair—but when she took a bite and grinned, I knew this was exactly the kind of messy, joyful memory we needed that season.
Ingredients
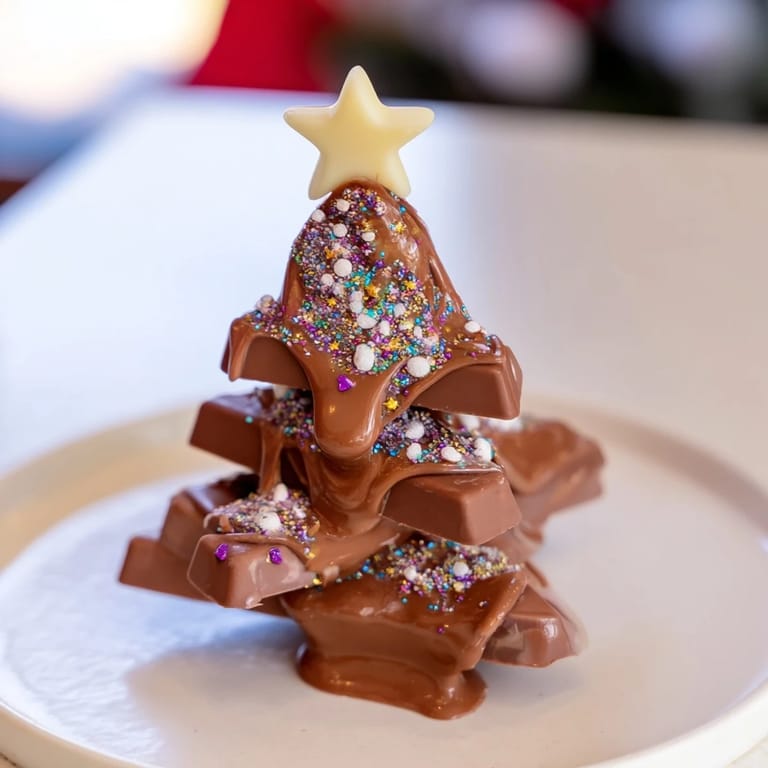
- 24 mini Kinder chocolate bars: These are the foundation of your trees, and their familiar gold and red wrapping makes them feel inherently festive. You can swap in any mini chocolate bars you love—just make sure they're sturdy enough to stack without crumbling.
- 150 g dark or milk chocolate, chopped: This is your glue and your drama; use what you actually enjoy eating because you'll taste it in every bite.
- 1 tsp coconut oil (optional): This little secret makes the chocolate flow beautifully when drizzling without becoming too thick or greasy.
- 3 tbsp festive sprinkles or edible glitter: This is where personality happens—use whatever makes your kitchen feel celebratory.
- 8 mini chocolate stars or candy stars: These crowns transform stacked bars into unmistakable trees and give kids something fun to place on top.
Tired of Takeout? 🥡
Get 10 meals you can make faster than delivery arrives. Seriously.
One email. No spam. Unsubscribe anytime.
Instructions
- Set up your workspace:
- Line a baking tray with parchment paper so your finished trees won't stick to anything. Having everything ready means you can move fast once the chocolate is melted and warm.
- Build your trees:
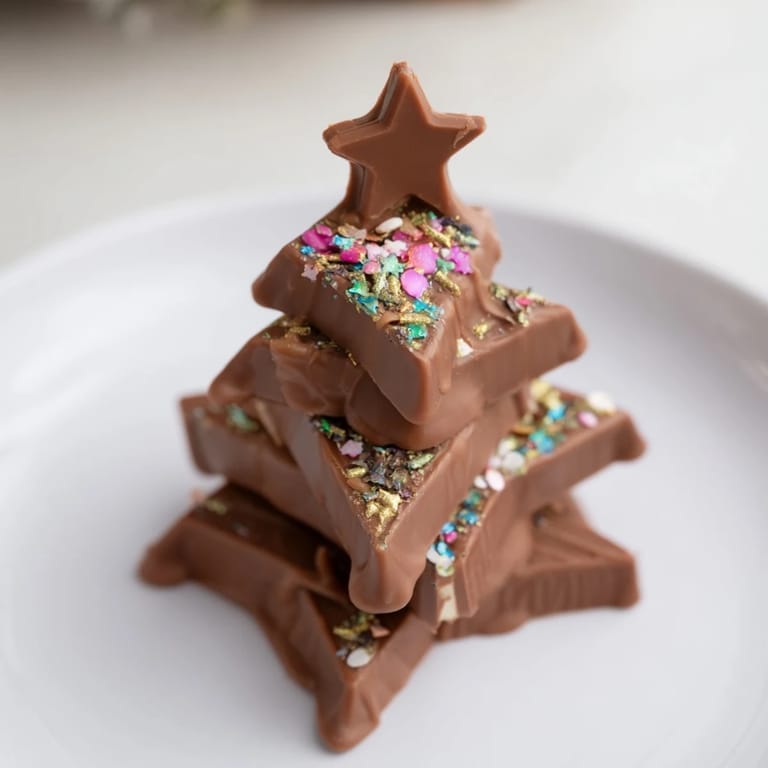
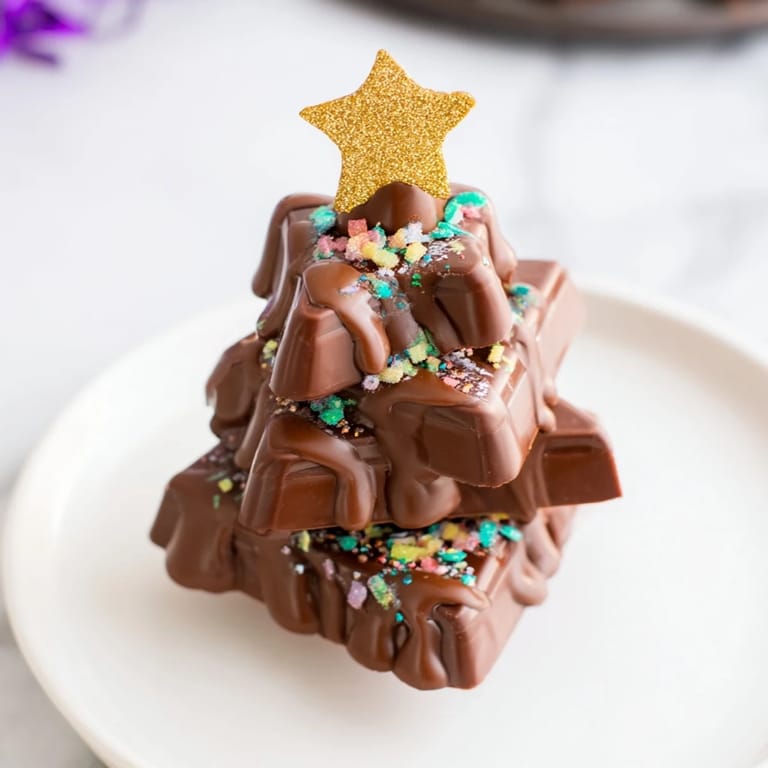
- Unwrap all the Kinder bars and start stacking—one whole bar as the base, one broken in half to create a wider middle that looks like branches, then another whole bar on top for height. Don't stress about perfection; even wobbly stacks look intentionally rustic once drizzled with chocolate. Space them out on the tray so they have room to breathe.
- Melt the chocolate gently:
- Either place your chopped chocolate and coconut oil in a heatproof bowl over barely simmering water, stirring occasionally, or microwave in 20-second bursts, stirring between each round until completely smooth. The slow method is more forgiving, but either way, stop as soon as it's melted—overheated chocolate gets thick and stubborn.
- Drizzle with confidence:
- Use a spoon or piping bag to generously coat each tree stack, letting chocolate pool in the crevices between the bars. The messy drizzle is the whole point—it looks like icicles caught mid-melt.
- Decorate immediately:
- Before the chocolate sets even slightly, scatter sprinkles over each tree and crown it with a star. Once chocolate firms up, nothing sticks, so move fast and let instinct guide you.
- Chill and set:
- Pop the tray in the refrigerator for 10 to 15 minutes until the chocolate feels completely firm to the touch. This also helps the sprinkles stay put.
 Save to Pinterest
 What stuck with me most wasn't the taste—though these trees absolutely deliver on rich, chocolatey satisfaction—but the moment when someone asked if I'd made them professionally. That feeling of being able to create something that looks intentionally crafted and beautiful in just minutes? That's the real magic of this recipe.
Why Kids Love the Process
Stacking is genuinely fun, and there's no wrong way to do it. Let them arrange the bars however they imagine a Christmas tree should look, whether that's perfectly symmetrical or hilariously abstract. The moment they sprinkle and place the stars on top, they own the creation completely, and somehow food tastes better when your hands built it.
Chocolate Choice Matters More Than You'd Think
I've made these with white chocolate for a snowy effect, dark chocolate for a sophisticated vibe, and even milk chocolate swirled with dark for drama. Each version tastes completely different, so lean into whatever makes you happiest. The chocolate is doing most of the heavy lifting here, so pick something you'd genuinely eat on its own.
Storage and Holiday Timing
These trees stay perfect in an airtight container for up to a week, which means you can make them days ahead and still impress. They're fine at room temperature, but I prefer them chilled because the chocolate texture stays snappy and the whole thing feels more indulgent. Make them the day before a party so you have one less thing to think about when people arrive.
- Store them in a cool place away from direct sunlight so the chocolate doesn't soften or discolor.
- If you're making these for a bake sale or gift, wrap them individually in cellophane and tie with ribbon for a polished finish.
- These freeze beautifully for up to two weeks if you need to get ahead on holiday prep.
 Save to Pinterest
 These little trees have quietly become my favorite last-minute dessert, the one I make when I want to feel like I've done something special without actually stressing. They're proof that the simplest recipes, made with care and a little chocolate, create the moments people actually remember.
Recipe FAQs
- → What type of chocolate works best for drizzling?
Use dark, milk, or white chocolate based on preference. Adding coconut oil helps achieve a smooth consistency for easy drizzling.
- → Can any mini chocolate bars be used instead of Kinder bars?
Yes, any similarly sized mini chocolate bars can be substituted to customize flavors or dietary needs.
- → How should the chocolate bars be stacked to resemble trees?
Stack three bars with one whole at bottom, a halved piece overlapping in the middle to form a triangle, and one more bar on top to add height, mimicking a tree shape.
- → Is it necessary to chill the stacks after assembling?
Chilling helps the chocolate drizzle set firmly, making the treats easier to handle and enhancing presentation.
- → Are kids able to assist in making these treats?
Yes, the stacking and decorating steps are easy and safe, making these treats a fun activity for children.
- → How should these treats be stored?
Keep in an airtight container in a cool place or refrigerator for up to one week to maintain freshness.